
OrbStack vs Docker Desktop
How OrbStack compares to Docker Desktop on macOS: architecture, installation, and context switching explained.
I needed a Linux VM on my Mac for a VPS setup, and instead of paying for a cloud box I decided to run one locally. That investigation led me to OrbStack, which does two things: runs Docker containers and provisions Linux VMs on macOS. Along the way I found it to be a much better fit than Docker Desktop for local dev. This article covers the architectural difference, what happens during installation, and how to handle the context-switching problem if you have both installed.
What is OrbStack
OrbStack runs Docker containers and Linux virtual machines on macOS. It presents itself as a drop-in replacement for Docker Desktop (same Docker API, same docker CLI), but it’s built from scratch specifically for macOS rather than being a general cross-platform tool.
The core idea: instead of a heavyweight, one-size-fits-all VM, it’s built on top of the macOS Virtualization framework, closer to native hardware without extra layers in between.
Architecture: one VM per app vs one shared VM
Docker Desktop provisions a dedicated Linux VM whose only job is running the Docker engine.
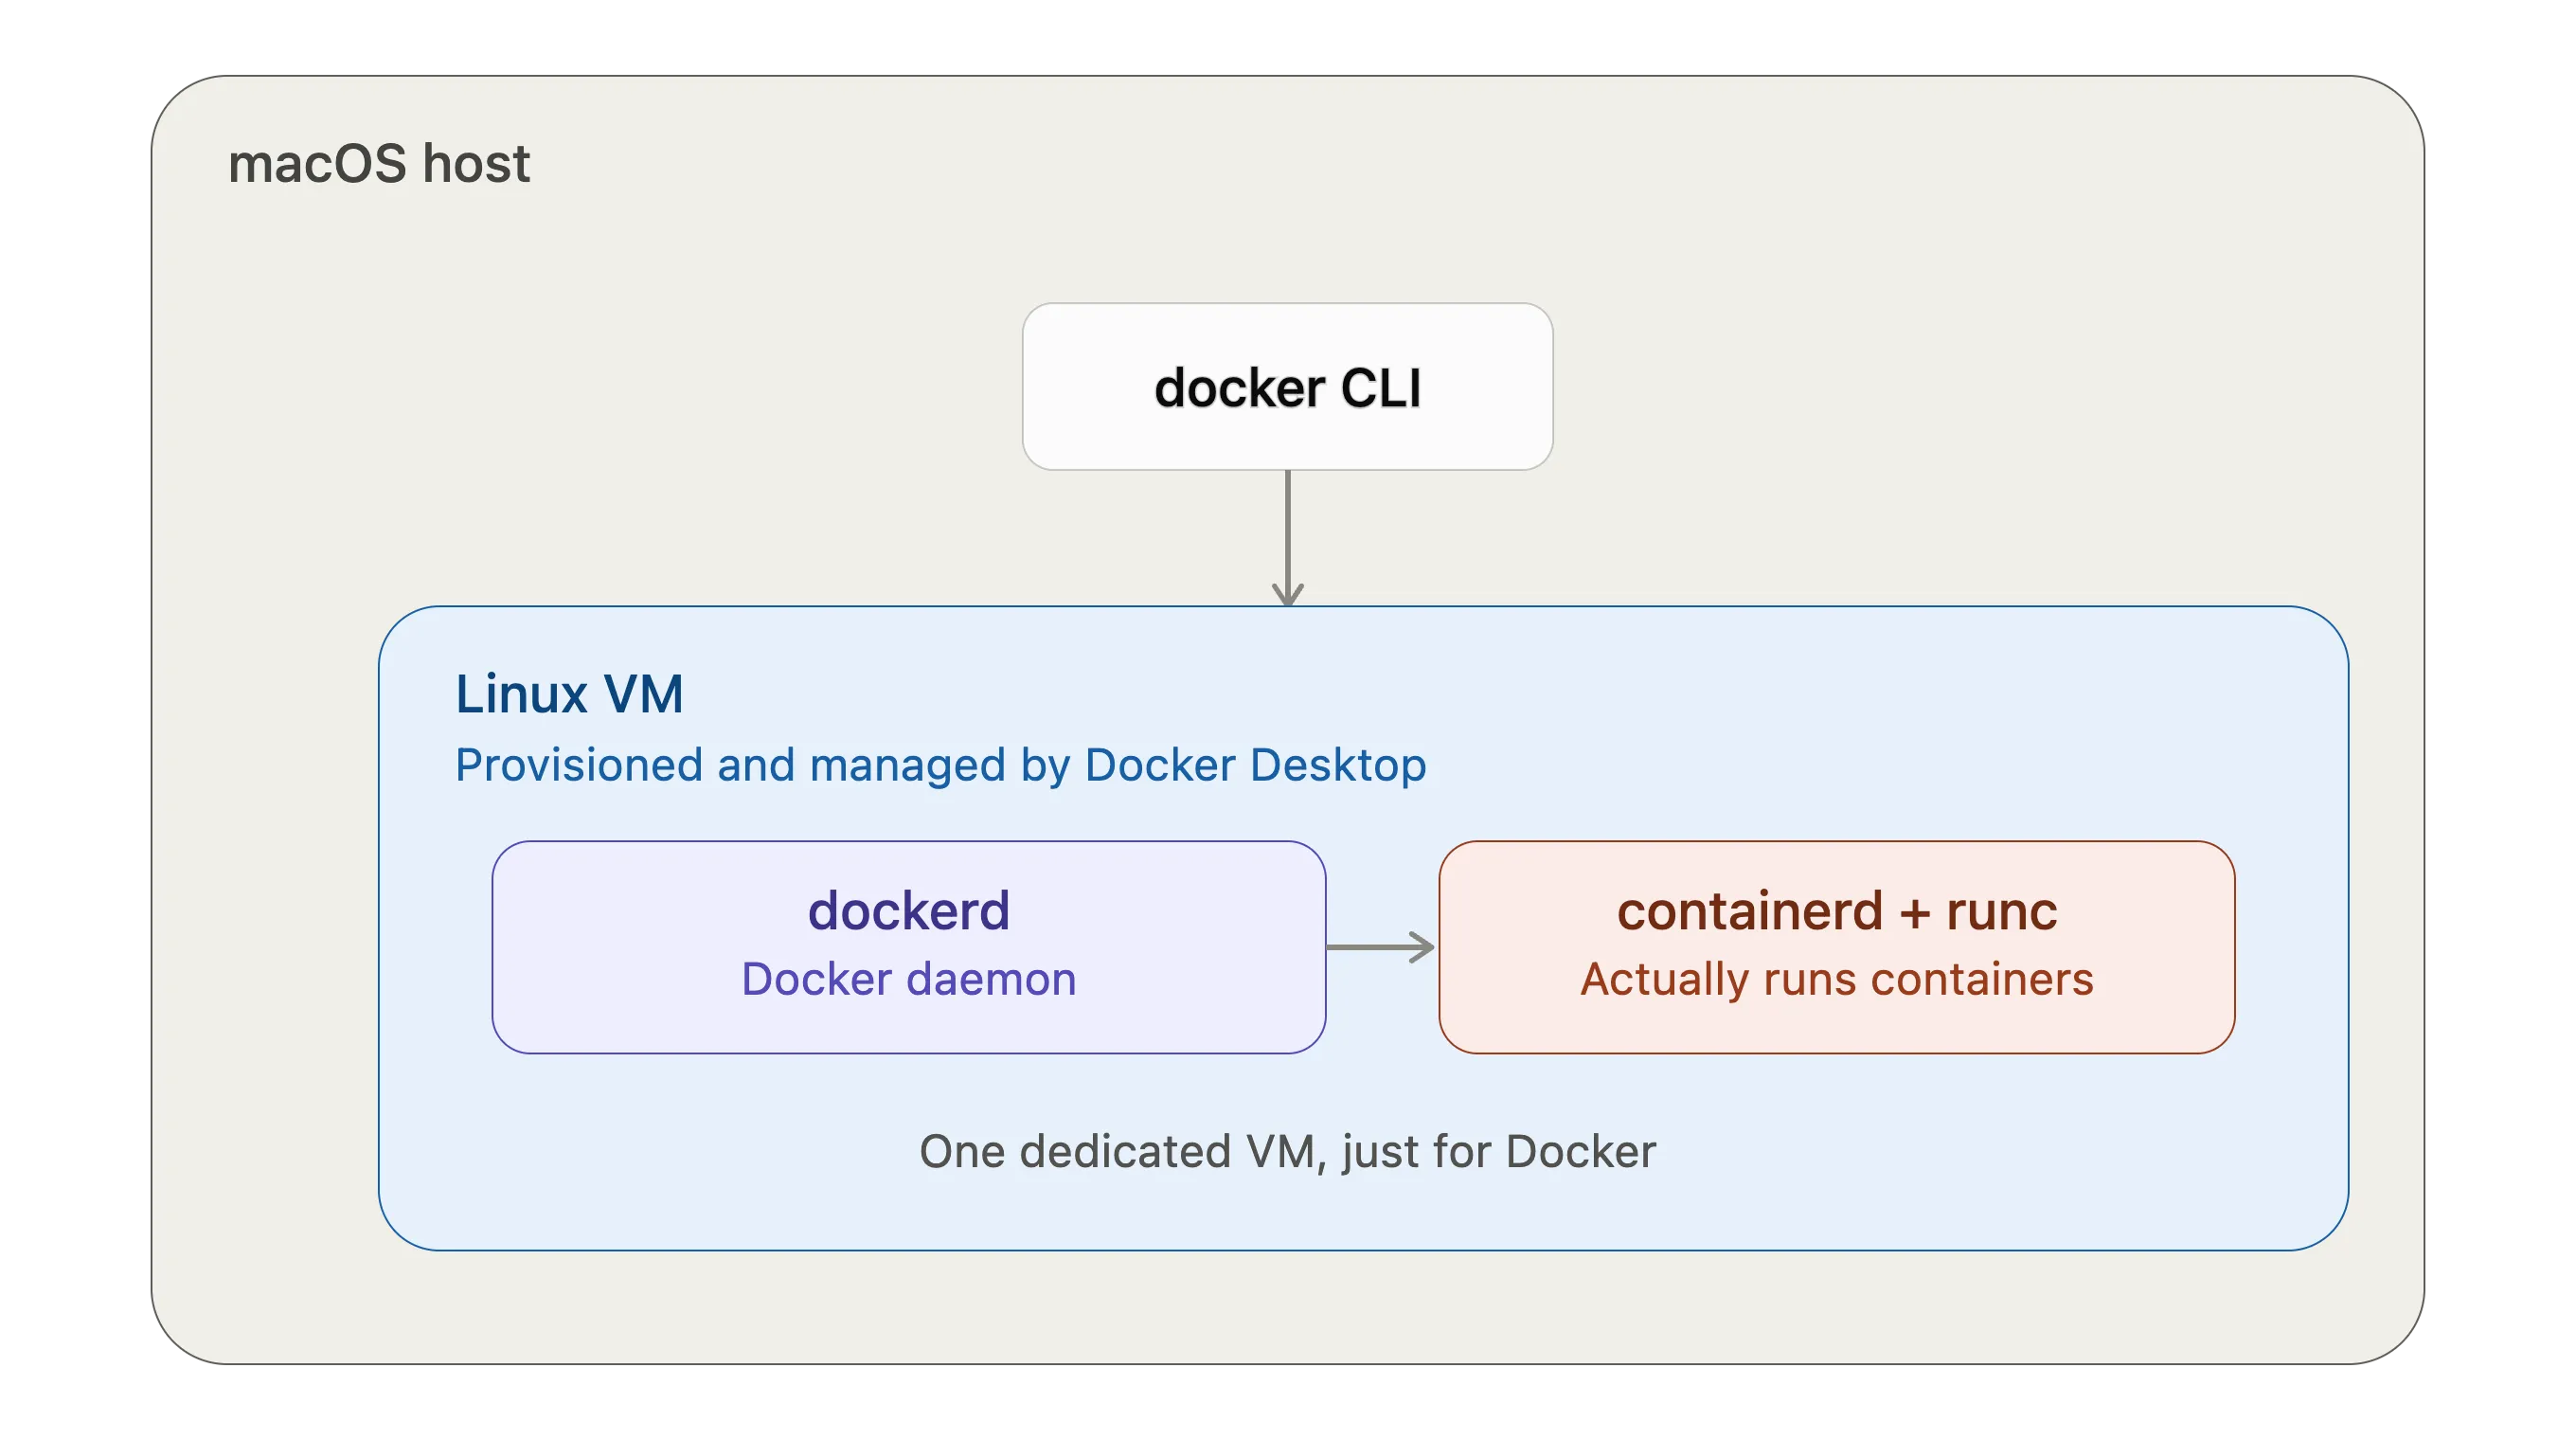
OrbStack runs a single lightweight VM with a shared kernel, similar to WSL2 on Windows. The Docker engine and any Linux machines you provision run side by side inside that one VM.
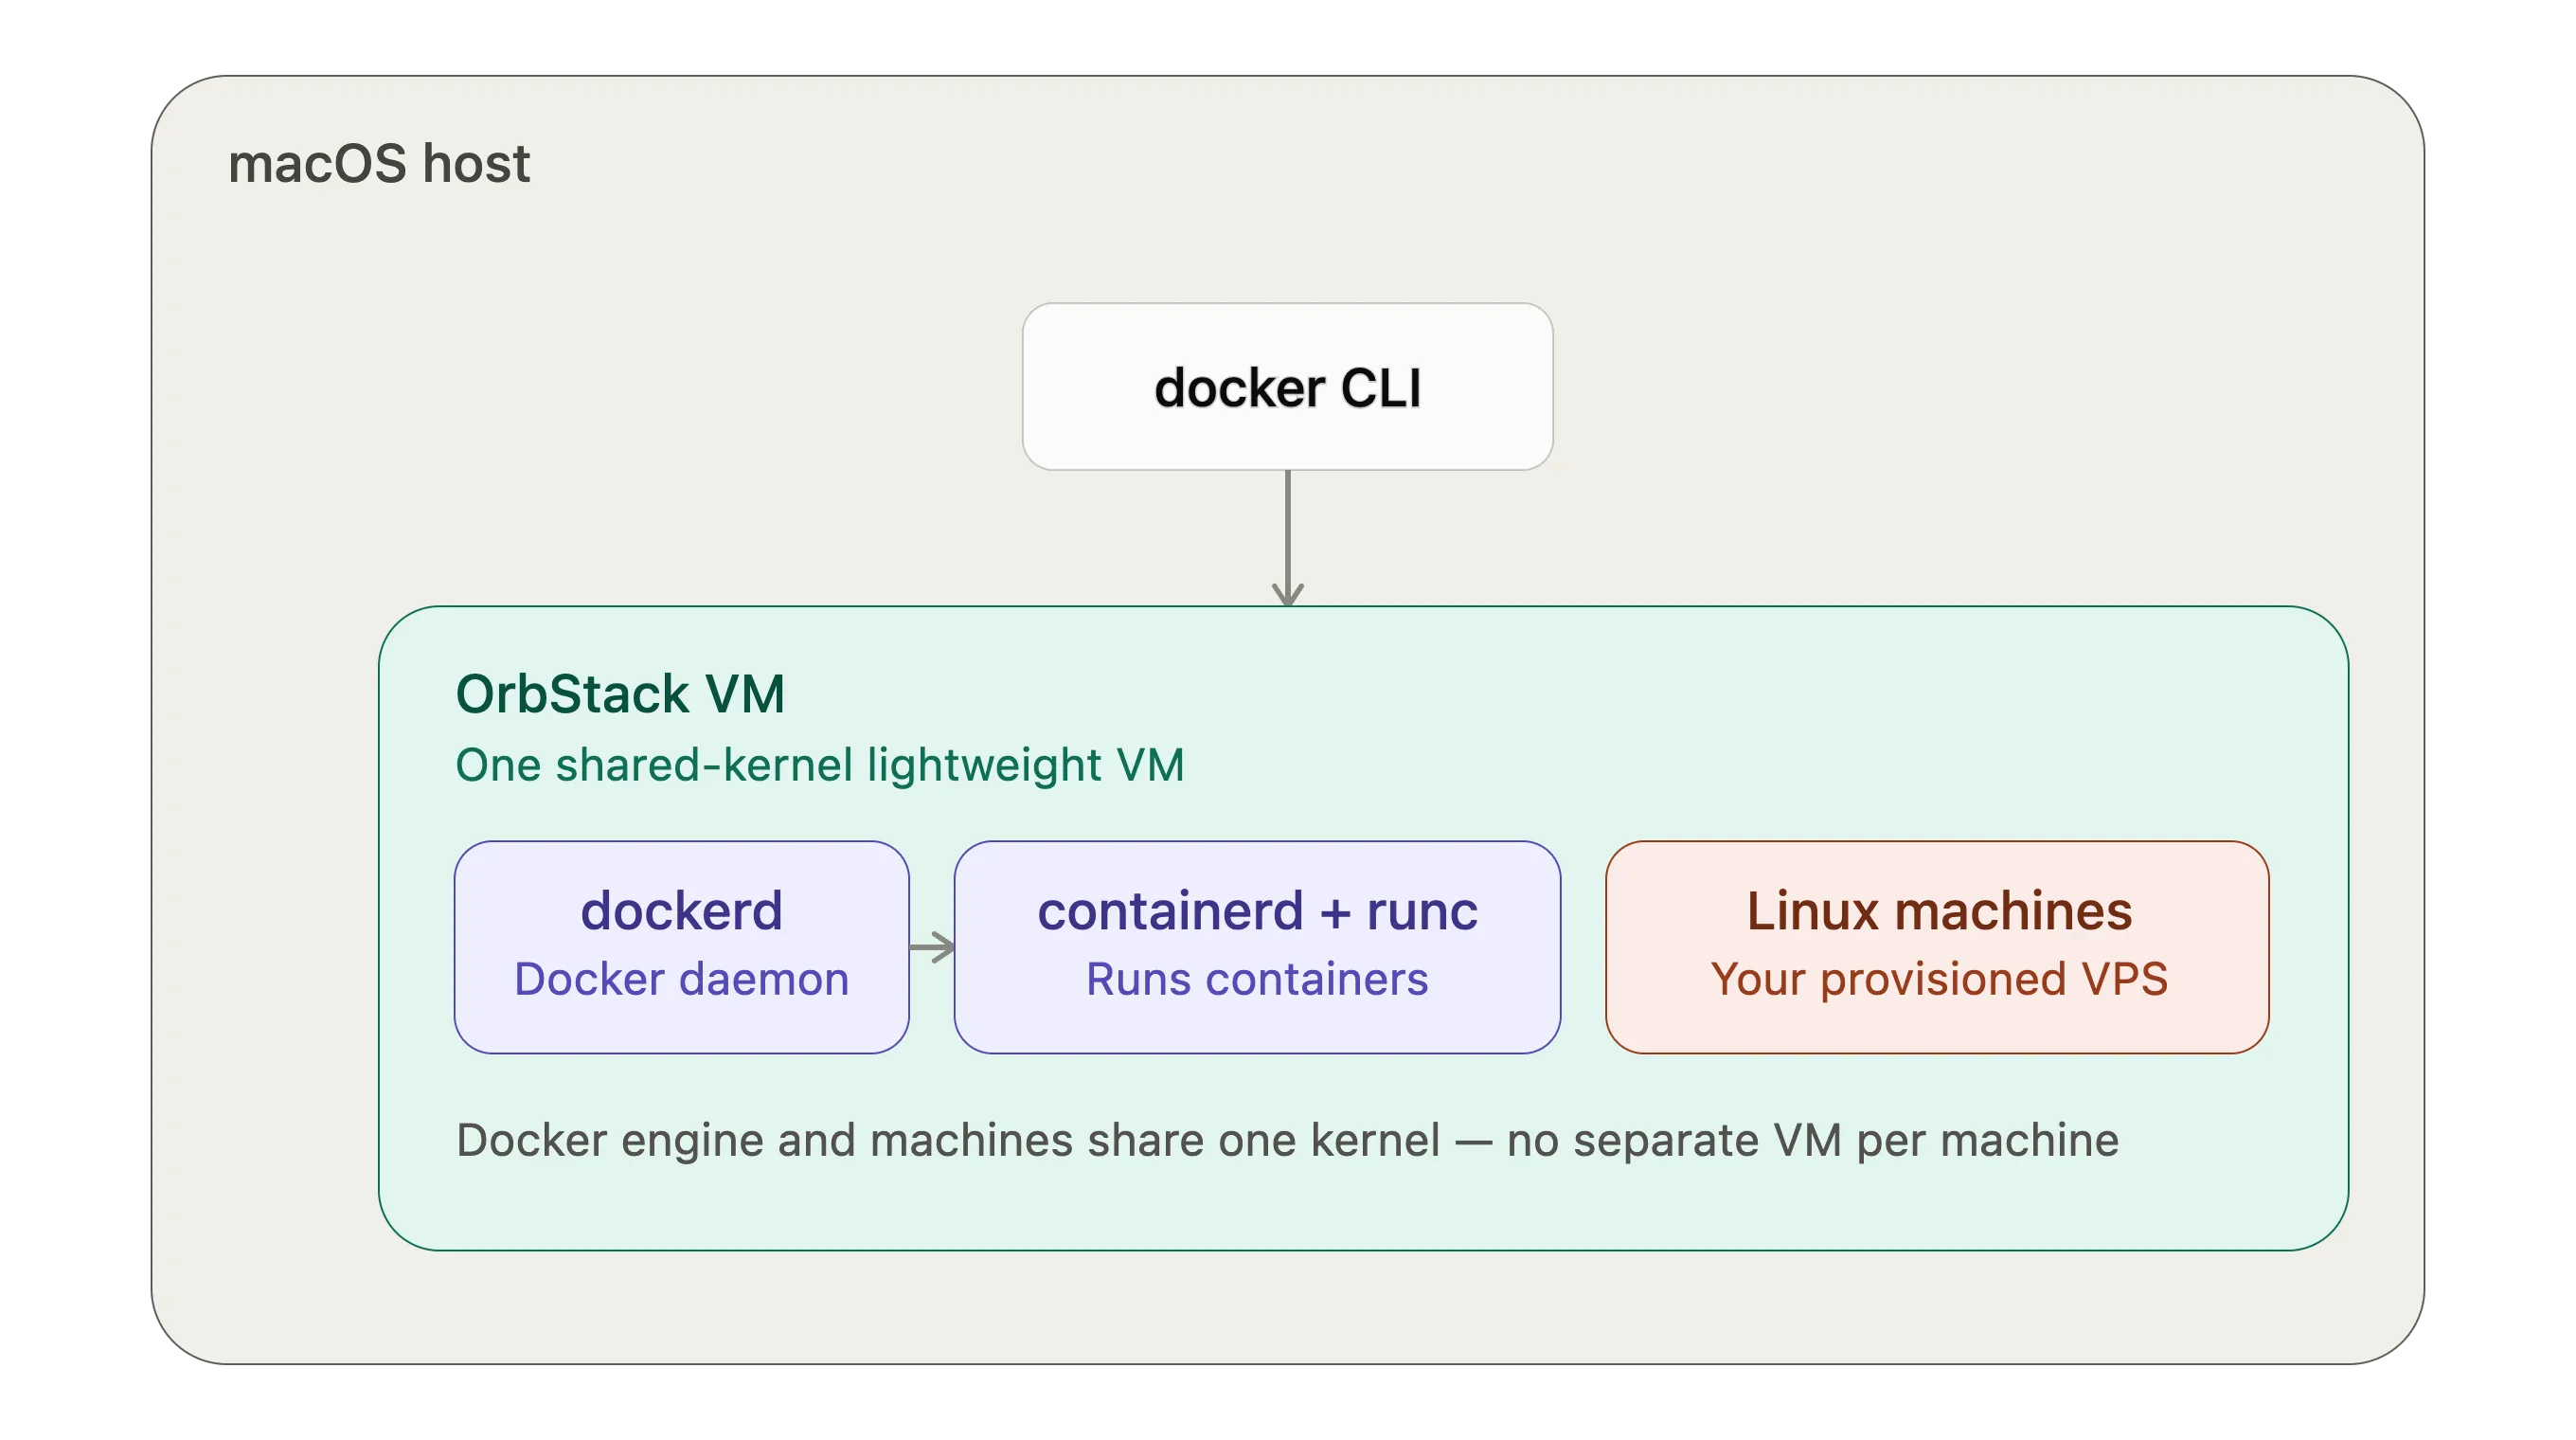
This is why creating a new Linux machine in OrbStack is nearly instant: there’s no new kernel to boot. It’s also why the Docker engine stays lightweight when idle because the VM is already running and shared.
Resource usage difference in practice: OrbStack typically uses around half the RAM of Docker Desktop at rest. Docker Desktop’s dedicated VM keeps a full Linux kernel resident in memory even when no containers are running. OrbStack’s shared VM is leaner because the same kernel serves both Docker and any Linux VMs you’ve provisioned.
Can I use the same Docker tools?
Yes. OrbStack provides an unmodified Docker engine: the real, official open-source binaries from Docker’s Moby Project, not a reimplementation. This means the Docker CLI, Compose, and third-party tools like Earthly and VS Code Dev Containers all work without any changes.
A quick note on what “unmodified” actually means: the Docker engine consists of dockerd, containerd, and runc. containerd was donated to the CNCF and is now used by Kubernetes and other runtimes beyond Docker. runc came out of the Open Container Initiative (OCI). The source lives in Docker’s open-source Moby Project, and Docker Desktop itself is built on top of it. When OrbStack says “unmodified,” it means they run those exact Moby binaries, just inside their own lightweight VM instead of Docker Desktop’s dedicated one.
Installing Docker Desktop vs OrbStack
Docker Desktop installation:
Installs the docker CLI, provisions a dedicated Linux VM, and starts the Docker engine (dockerd, containerd, runc) inside that VM.
OrbStack installation: Installs one lightweight VM using the macOS Virtualization framework, then runs the Docker engine (same Moby binaries) inside it. Linux VMs you create later share this same VM.
If Docker Desktop is already installed
After installing OrbStack, the docker CLI may still point to Docker Desktop’s daemon. This happens because Docker Desktop installs /usr/local/bin/docker as a symlink into /Applications/Docker.app, and the CLI reads a context config to know which daemon socket to connect to.
There are three ways to fix it:
Option 1: Uninstall Docker Desktop. Removes its symlinks and daemon entirely. OrbStack’s CLI and socket become the only ones on the system.
Option 2: Update PATH. If both are installed, whichever docker binary appears first in your shell’s PATH wins. Reorder PATH to put OrbStack’s binary first.
Option 3: Switch the docker context. The quickest fix. It doesn’t touch PATH or require uninstalling anything. See below.
Switching docker contexts
List available contexts:
docker context lsThis shows every context the CLI knows about, each pointing at a different daemon socket. The * marks the active one:
NAME              DESCRIPTION                               DOCKER ENDPOINT
default           Current DOCKER_HOST based configuration   unix:///var/run/docker.sock
desktop-linux *   Docker Desktop                            unix:///Users/bagisetti/.docker/run/docker.sock
orbstack          OrbStack                                  unix:///Users/bagisetti/.orbstack/run/docker.sock
With Docker Desktop not running, any docker command fails:
> docker ps
Cannot connect to the Docker daemon at unix:///Users/bagisetti/.docker/run/docker.sock. Is the docker daemon running?
Switch to OrbStack:
docker context use orbstackAfter that, every docker command talks to OrbStack’s daemon:
> docker ps
CONTAINER ID   IMAGE     COMMAND   CREATED   STATUS    PORTS     NAMES
How the CLI stores its active context
The docker CLI persists the active context in ~/.docker/config.json under the currentContext field:
{
  "auths": {
    "https://index.docker.io/v1/": {},
    "https://index.docker.io/v1/access-token": {},
    "https://index.docker.io/v1/refresh-token": {}
  },
  "credsStore": "osxkeychain",
  "currentContext": "orbstack"
}
Worth noting: the auths entries are empty objects. That’s because credsStore: osxkeychain means real credentials live in macOS Keychain, not in this file. If you see populated values there instead, it means no credential store is configured and your tokens are sitting close to plaintext on disk.
Which should you use?
If you’re on macOS and primarily doing local development, OrbStack is the better choice. It’s faster to start, uses less memory, and adds the ability to spin up full Linux VMs alongside Docker, all from a single lightweight VM. The Docker compatibility is exact, not approximate, so nothing in your existing workflow breaks.
Docker Desktop makes sense if you need its GUI-heavy workflow, team licensing features, or you’re on a non-Mac platform where OrbStack isn’t available.